Shader Graph: An Introduction to Creating Mind-Blowing Visual Effects
Unity provides a convenient canvas (or "graph") that you can use to add specific shader nodes without having to code them from scratch. Each of these shader nodes is designed to do different things. B. Change the overall color, add noise, or change the look of the mirror lighting. There are over 200 nodes in Shader Graph, so the options are endless.
What are Shaders?
First, let's talk about the shader itself. Simply put, a shader is a program or script that determines how each pixel on the screen is rendered based on the settings of a particular shader. You can think of shaders like photo filters, but in this case, you're manipulating complex meshes, lighting, and similar data instead of photos. Shaders can still compute all this graphics information and modify the original pixel data to make it completely new.
In short, shaders are tools you can use to change the appearance of graphics programmatically.
What is Shader Graph?
Shader Graph is Unity's solution for working with shaders. Unity provides a convenient canvas (or "graph") that you can use to add specific shader nodes without having to code them from scratch. Each of these shader nodes is designed to do different things. B. Change the overall color, add noise, or change the look of the mirror lighting. There are over 200 nodes in Shader Graph, so the options are endless.
However, with Shader Graph you can wire up nodes to combine these effects and finally give your graphics a new look.
Unlike writing, saving, compiling, and testing code in the editor, Shader Graph shows you what's happening to your footage in real-time, allowing you to make changes and experiment on the fly.
A shader Graph is incredibly powerful and can get very complex. Now that you understand the basics of Shader Graph creation, you can create and experiment with your own Shader Graph.
Download and Import Shader Graph
-
Goto window and open package manager
-
In UnityRegistry type Shader Graph in the search bar and download and import the shader graph package.
Creating the Graph and First Nodes
-
Create a new folder called "Shader Graph" in your project window.
-
Right-click in the project window and on the Create menu go to Shader Graph and select BuiltIn and then Unlit Shader Graph. A new shader diagram is created in the project window.
-
Name the new Shader Graph as you want.
-
Double-click on the shader to open the Shader Graph window.
-
Arrange the Shader Graph window as you want.
-
Right-click or press the spacebar in the work area, and select Create Node.
-
In Create node window go to Input and then Texture and add Texture 2D Asset. And also add Sample Texture 2D
-
In the texture slot at the bottom of the Texture2D asset, click the radio button and browse to the texture you want and connect to the Texture on Sample Texture 2D.
Let's start Building a Graph
-
Select both newly created nodes and press Ctrl+D(Windows) OR Cmd+D(Mac) to duplicate the nodes
-
In the second Texture2D Asset Node, find and apply a secondary texture to blend. I applied Gradient Texture here.
-
Create a new Node having Tiling and offset
-
Connect the Tiling and Offset out(2) to the Sample Texture 2D Asset UV(2).
-
Set X and Y values to 3 in the Tiling node. You can set different values depending on the output you want.
Now start with Blending Textures together
-
Create Divide Node.
-
Connect the A(1) output of the Checker Sample 2D Node to the A(1) Divide Node input.
-
Set the Divide Node’s B(1) X input to 20
-
Create Blend Node
-
Connect the Divide Out(1) output to the first Blend Base(1) input. And connect the Gradient Sample Texture2D A(1) output to the second Blend blend(1) input
Add Color and Connect the Shader
-
Create Color node
-
Set the Color Node to a bright cyan and the mode to HDR.
-
Create another Blend Node. then Connect the RGBA(4) output of the first Sample Texture2D Node to the first Base(4) Node of the new Blend. Connect the Color Nodes Out(4) output to the Blends Second Base(4).
-
Set the Blend Nodes Mode to Darken
-
Connect the Blue Blend Nodes Out(4) output to the Fragment Base Color(3) input.
-
Create a Block node in the Fragment node by right click on it.
-
Connect the Gradient Blend Nodes Out(1) output to the Fragments Alpha(1) input.
-
Set surface type to Transparent from the graph inspector window.
-
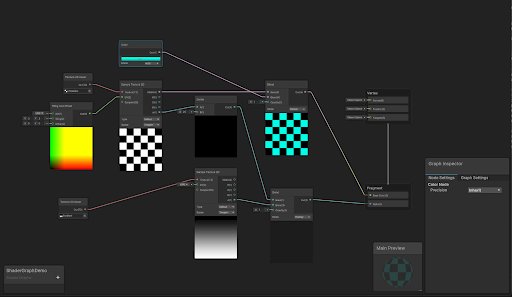
Now save an asset from the top left corner of the shader graph window and you can see the preview in the main preview window.
Conclusion
Shader Graph is very powerful and can get very complex. There are many nodes to choose from. Now that you know the basics of Shader Graph creation, you can experiment by creating your own Shader Graph.
If you have any questions regarding Unity development. Connect with us today!
Click Here To See More
What's Your Reaction?